
To legally drive your golf cart on the street in Florida, you must go through the process of converting your cart into a street legal LSV or “Low Speed Vehicle”. This is a multi-step process that not only involves installing parts, but navigating an array of compliance issues that most come from the paperwork.
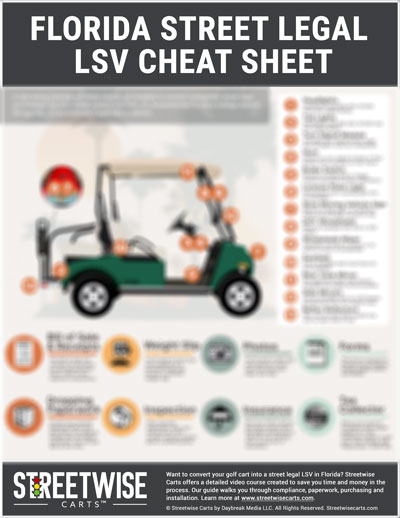
There are 10 key elements to converting a golf cart into a street legal LSV in Florida.
- Bill of Sale
- Receipts
- Safety/Street Parts Installed
- Weight Slip
- Photos of Cart
- Filling out Forms
- Dropping off Paperwork
- Inspection
- Insurance
- Title/Plate/Registration
1. Bill of Sale
Your bill of sale is a crucial document in the process, and it should list all the street-legal parts that were included when you bought the vehicle. The bill of sale and receipts for the parts you purchased must cover 100% of the required components.
Even if your cart already had certain parts, like lights or parking brake, they need to be listed on the bill of sale. Additionally, the bill of sale must be in your name, as the builder.
When it comes to private party bills of sale, the state office requires certain information to be included, such as the purchase price, seller’s name/address, and the signature of the seller. A cart from a dealer does not need a signature.
2. Receipts
When submitting your paperwork to the state, you will be required to submit receipts for all of the street legal components that were not on the cart’s bill of sale. When the compliance inspector reviews your receipts they will be looking for these details…
- Your name
- Seller’s name and address
- Sales tax paid and marked as paid
- 0 remaining balance
Keep in mind that each office and employee may have different requirements, so make sure your receipts have enough information to avoid any issues.
3. Safety/Street Parts Installed
This is a comprehensive list of the parts required to be installed on your golf cart. Some of these “standalone” parts (windshield or mirror for example) are considered very easy to install, while others will take a bit more time and will likely require a new wiring harness (turn signal, lights, horn) to be installed throughout your cart.
It’s best to bundle electric parts together in a Street Legal Kit when possible.
Before we begin – Wiring Harness
While it sounds daunting, you will likely have to install a new wiring harness in order to install many of these electronics. Every cart is different, and depending on what model of cart you have, the process might vary when it comes to the wiring and electronics. In general EZGO carts provide the most simple platform for installation, whereas Club Cars tend to be slightly more (although not terribly) complicated. You can get an idea for the job ahead of you by watching our wiring harness installation tutorial below.
Below is a list of parts along with a high level overview of what’s involved with its installation. These parts are listed in order of recommendation for how they should be installed. This list does not include the Wiring Harness discussed above or a (recommended for electric carts) Voltage Reducer or Fuse Box.
Headlights /Tail Lights
Installed by cutting holes in your cart with a jigsaw, connect to your wiring harness. Typically headlights include orange turn signal flasher in assembly, tail lights flash when turn signal activated by the turn signal module (below).
Turn signal Module
Connects to wiring harness, might also control these features, horn, hazard flashers, headlights, hi-low beam. Mounts to steering column. Some have flashing leds on the unit, a few make noises.
Horn
Mounts to underside of front of cart, typically on the frame. Also plugs into wiring harness or can be wired by itself. If plugged into wiring harness, triggered by turn signal module button or when wired by itself usually triggered with a foot button.
Brake Lights
In order to trigger brake lights, a switch must be installed. Sometimes looks like a flat pad that is affixed to this brake pedal, or a mechanical plunger type switch that is installed into the mechanics of the brake pedal underneath the floor mat. Either will also attach directly to the wiring harness.
License Plate Bracket w/Light
Is a 12v light that gets power by tapping into the running light wire on the rear tail light. Sometimes this light is combined with a license plate bracket.
Slow Moving Vehicle Emblem
Standard sized triangle sign, typically made from aluminum or plastic. Commonly the license plate is mounted on top of this sign.
Windshield
Must have DOT stamp on windshield and be AS1, AS4, or AS5. This is likely the most expensive things you’ll need to buy in this process.
Windshield Wiper
Most common style is a hand wiper that mounts by being inserted into a 1/2 inch hole which is drilled into the windshield with a step bit. These manual wipers are not very functional and if you can find a non-drill wiper that is probably your best bet.
Seatbelts
Each available seat needs its own seatbelt. It’s best to buy a kit which includes the seatbelt crossbar along with the retractable belts and clips that they are inserted into.
Rear View Mirror
Several styles to choose from including various shaped panoramic/convex and 4 or 5 panel.
Side Mirrors
Available in drill or no-drill options. Also for a slightly higher price, LED turn signal indicator mirrors can be purchased which are wired into your headlights.
Reflex Reflectors
Red reflective stickers or plastic reflectors are required in the following locations: on the side of the cart towards the rear, in the rear of the cart towards the corners. Instead of 4 reflectors, you can use a reflective tape and place it along the corner of the rear passenger foot rest if available.
DOT Tires
Tires must be marked as DOT Approved.
4. Weight Slip
When you drop off your paperwork at the state office, you will need to provide certified weight slip. Make sure when you bring your cart to the scale you safely transport your cart. Many places offer certified weight scales to get the necessary weight slip. Before going, call to confirm they’re open and able to provide the certified slip. If you explain your needs, they will tell you if they can help. If they can’t, they might have a recommendation.
5. Photos of Cart
When submitting your paperwork, you need to include photos of your cart from the front, back, and side. It’s okay to print them in black and white, and you can use your phone to take the photos. You can email them to yourself or use Airdrop if you have an iPhone. Don’t worry about getting high-quality pictures, and it’s fine if they’re taken in your garage. Just make sure to include them with your paperwork as it’s a requirement. As of 2023/2024 you also must submit a photo of your cart’s serial number.
6. Fill out Forms & Drop Paperwork
The forms required in Florida are as follows – 82040, 84490, 84491, and 86064. Complete these forms to the best of your ability.
7. Dropping off Paperwork
Bring your forms to the Motorist Services Regional Office along with your bill of sales, receipts, weight slip, and photos. At this time, there will be a $40 fee. You do not need to bring your golf cart to drop off this paperwork.
8. Inspection
As of 2023/2024 there is no longer an in-person inspection. Instead your photos and paperwork are all reviewed by the compliance officer independently.
The state will call you to set an appointment for your inspection. You will need to trailer your cart back to the regional office where you dropped your paperwork. Expect to take your cart off the trailer and have the inspection personnel at a minimum test out your turn signals and check the windshield.
If you pass the inspection you will receive a VIN number which gets taped to your steering column, along with a sealed packet which you take to the Tax Collector’s office. Do not open this packet.
9. Insurance
You will need to get an insurance policy for your LSV, similar to that of a car with the same legal state minimums of 10k PIP and 10K PDL. Print your proof of insurance and bring it with you for the next step.
10. Get Title/Plate/Registration
The final step in the process is taking your sealed packet to your local Tax Collector’s office. In this final step you will pay any sales tax which wasn’t paid when the cart was purchased, along with title/tag/plate fees typically around $350-400.
Need more help converting your golf cart into a street legal LSV?
- Download our free Golf Cart to LSV Cheat Sheet It’s a free, visual guide to help you understand the steps involved in converting a golf cart into a street legal LSV.
- Enroll in our free Parts Installation Mini-Course This is a portion of our larger course that includes all of the installation videos along with a free Parts Buying Worksheet
- Check out our Golf Cart to LSV Video Course You’ll get 50+ step-by-step videos along with downloadable checklists, templates, and pre-filled forms to save you time and money during the conversion process.
